Wednesday, April 2, 2014

Simnel Cake – Fact or fiction? A charming story and a delicious cake.

Shrewsbury Simnel Cake

It’s been quite some time now since I’ve been inspired to write something about food.  Maybe because since New Year 2014 I’ve been watching my weight – well I’ve always watched my weight, but usually I watched it creep up!  Just after the New Year I decided that enough was enough so I stopped drinking alcohol and cut out all kinds of useless calories and it’s working.  Someone asked me yesterday where my overweight twin had got to; he hadn’t been around for a while.  Now, that did do my ego and resolve a power of good!  However yesterday I slipped, more anon.

I remember that my mum used to make a special cake for Easter, called a “Simnel Cake,” so I looked it up on the ‘tin brain’ to find out more about it.  Simnel cakes, it seems, have a long and interesting history and not a little mythology attached.  The main thread is that they were made by servant girls in grand houses, as gifts for their mothers at Easter and usually given on the girls’ first day off after the hiring fair.  I imagine that they were given the leftovers from the “Big House” pantry when the family decided that they would move back to the country in the spring after wintering in London; or when they just got fed up of eating rich winter food.  Whatever, the main ingredients are sugar, spices, dried fruit, marzipan and a key ingredient, in medieval times, was white flour - a great luxury.
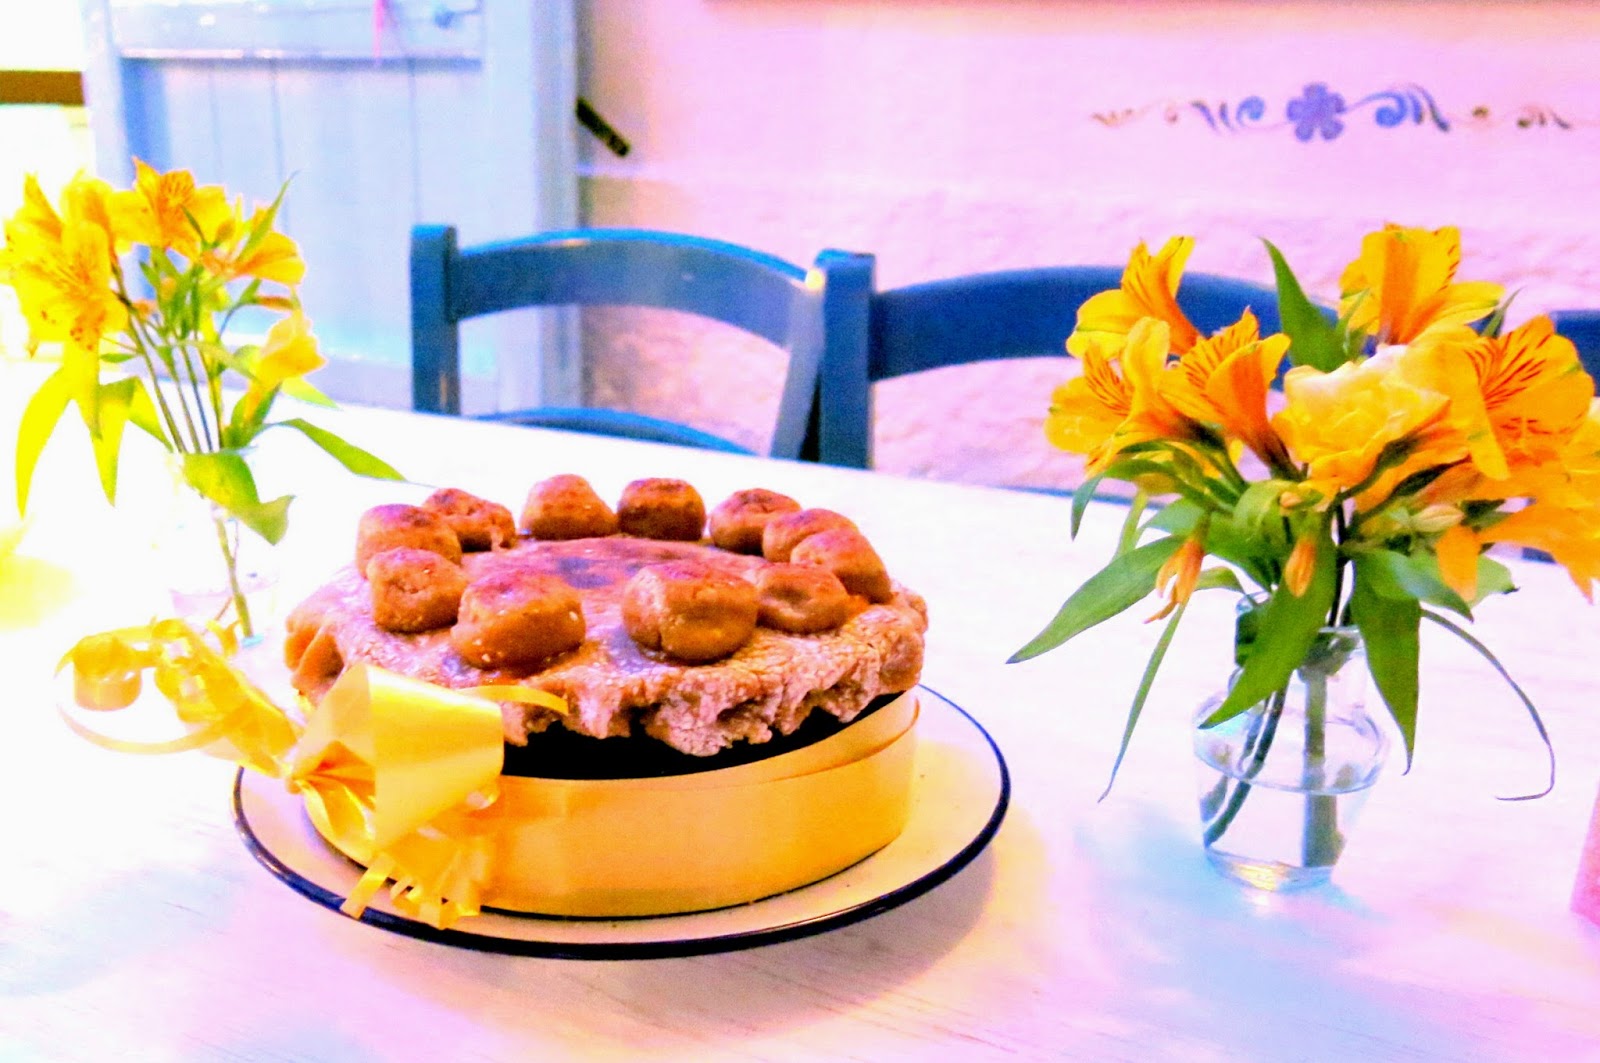


Now to my sin – having made some Simnel cakes, I made the version known as the Shrewsbury Simnel cake named after the city where it was first said to have been made, intending them to be Easter gifts for friends.  However, when I was invited to a birthday party at short notice and didn’t have a gift, hey ho, out came a Simnel cake in all its glory.  The lady in question couldn’t resist cutting it and sharing it with her guests and I couldn’t resist a slice – it was truly delicious and much appreciated.  So lovely people, here is the recipe.  I hope you enjoy making one or several, they do make great gifts and friends really appreciate the time and love that goes into a homemade gift, I can assure you.

Recipe

Ingredients

·         250g unsalted butter

·         175g plain white flour

·         4 eggs

·         200g soft brown sugar

·         100g ground almonds

·         2 heaped teaspoons allspice

·         1 heaped teaspoon ground cinnamon

·         1 heaped teaspoon ground nutmeg

·         1 level teaspoon ground cloves

·         150g golden sultanas (or more or less to suit your taste)

·         150g glace cherries (or more or less to suit your taste)

·         1 level teaspoon and a pinch baking powder

·         1 dessert spoon vanilla essence

·         1 dessert spoon glycerine

·         500g homemade marzipan (for the recipe see below)

Method
Preparation
Set the oven to 150 C
Prepare a 21cm loose based, spring sided baking tin by buttering it lightly, then prepare to line it with a double fold of baking parchment.  When you’ve made your double fold,  make another about 2cm up from the initial fold and snip linked “V” shaped serrations into it at the bottom (folded side) to enable it to fit easily to the sides of the baking tin.  Butter it on the inside side and fit it into the tin, with the “V” shapes at the base.  Cut a rough circle from the leftover butter paper and put it design side down into the base of the tin to secure the side lining.  Next, using the loose base of the tin as a template cut a double layer of baking parchment so that it fits snugly to the inside base of the tin.  Fit the base, butter the cut out circle and place it butter side down on the base making sure to cover the whole base including the “V” shaped cut outs.   I hate this bit, I’m glad it’s over!  In fact you can keep these “cartouches” as they’re called for another time, I do.  When you remove them from the cooked cake do it carefully, they ‘kind of mature.’  At least that’s my excuse.

Make the cake batter.
First scald the sultanas in a jug with enough boiling water to cover them, for about 30 minutes.
Beat the eggs with an electric whisk in a bowl

Soften the butter and beat in the soft brown sugar, until the mixture is well blended and light.  Add the beaten eggs a little at a time until the mixture is lovely and sloppy!  Beat in the spices, vanilla essence, glycerine, baking powder and finally the flour in maybe four portions, beating the mix to a smooth consistency between each addition.  Finally add the ground almonds and beat them in gently, by now the batter will be quite stiff, don’t overheat your beater!  Drain the sultanas and add them to the mix followed by the cherries. Now making sure they’re super clean, get your hands in, I love it!  Stir the batter by hand until you have the fruit evenly distributed through the batter.  We’re almost there – but now scrape your hands clean and wash them well, because its time to add the finishing touch, the marzipan that you have made earlier.

Roll out enough marzipan to make a circle at least 2cm thick, to fit maybe half a centimetre shy of the inside of the cake tin. Set it to one side.
Load approximately a half of the cake batter into the baking tin, making sure that it is level, next place the circle of marzipan on top.  Load the remaining batter on top of the marzipan; make a small depression in the centre of the batter so that when the cake rises during cooking, the baked cake has a level top, rather than a dome. 

Cook
Make a tinfoil ‘hat’ and fit it to the top of the parchment cartouche, we don’t want a burned finish after all this work. Put the cake tin on a lower middle shelf of the oven and bake the cake for two to two and a half hours at 150 C, check with a skewer in the usual way to check that the cake is properly cooked.  A tip – I like to put a big dish of water in the bottom of the oven when cakes are cooking, I tend to think it keeps them moist.

When the cake is cooked, remove it from the oven and allow it to cool in the tin for ten minutes or so before springing the sides.  Then, after putting the tinfoil hat on the worktop, invert the cake tin over it and lifting the sides of the tin first, take the cake carefully from the tin and recover the parchment cartouches.  The base of the tin will probably still be sticking to the bottom of the cake, remove it carefully.  Allow the cake to cool in this position overnight.
The reason for inverting the cake is to ensure a flat top for later decoration.
Decoration
This being an Easter cake, there is a strong Christian tradition attaching to how it is presented but you don’t have to be Christian to enjoy the result!  However, this is how it happened in “olden times.”

Roll out a circle of marzipan about 1cm thick, sufficient to overlap the top of the cake a little.  Warm a couple of dessert spoons full of apricot jam and spread it over the top of the cake.  Put the circle of marzipan on to the ‘jammy’ cake top, trim to a neat finish and pinch the edges as though you were sealing the top of a pie.   We’re almost done.  Now for the Christian bit!  Omit this part according to your views – but of course, you get less marzipan!

Make eleven balls from the remaining marzipan and fix them evenly around the circumference of the cake with a dab of jam.  So what’s Christian about that I hear you ask?  They are said to represent eleven of the twelve apostles, Judas having been dismissed for bad behaviour!  Isn’t folklore wonderful!

Lastly set the grill to ‘full,’ put the cake under and toast the marzipan topping and very, very carefully until it is just lightly browned.

To go the full “Monte” you can wrap yellow ribbon around the sides of the cake, tied off in a bow as you bring it to the table – but that really is showing off.

Voila, Done!

If you’ve got this far, thanks for reading the latest blog from Carl’s Crafty Kitchen!


Tuesday, March 11, 2014

Absolute Indulgence! Strawberries and Cream with a difference


Strawberry Meringue Gateau
I had a special request the other day from one of my dinner guests.  Could he have some proper custard with his steamed sticky toffee pudding, please, instead of salty caramel sauce?  Not a problem and best of all, my pal Ronnie, he of the Ecological Farm – Can Musson de Buen Honor, look it up on the www, its just an amazing enterprise, had given me a box of eggs straight from the chicken coop!  So – one delighted, custard connoisseur guest.
Ha, fooled you though, this recipe isn’t about making custard; I’ll do that another day.  Its on my usual theme, what to do with leftovers, in this case five amazing egg whites?  By the way the custard was mind blowing.
There was another stroke of luck at the market today too.  Big 2 kg boxes of Spanish strawberries for €4.98!  They’re big, almost certainly glasshouse grown and a bit under-ripe.  That isn’t a problem though, we’re not at Wimbledon.  That can be fixed, its easy.
So today’s crafty recipe is for meringues, of course, what else?  But not just ordinary meringues, Strawberry Meringue Gateau is my theme for today.
 
 
Sheer Indulgence
 
OK here we go, this is what we do.
First set the oven to 100 C and prepare two 21 cm flan tins by cutting circles of baking parchment to cover the base of each tin. Lightly grease their bases and sides with sunflower oil to prevent the finished meringues from sticking to the sides, then put the “cartouches” in (parchment circles to you and me!) and push then firmly into contact with the base of the tins.
Ingredients
Meringue
5 Eggs whites at room temperature
120 gm Caster Sugar
120 gm Icing sugar
Sunflower oil, a touch
Filling
500 gm strawberries
A small glug or two of Cointreau
1 tablespoon caster sugar
Cream
150 gm Mascarpone
250 ml whipping cream
50gm Icing sugar
Method
Meringue
In a clean glass or stainless steel (not plastic) bowl beat the egg whites with an electric whisk – on medium speed, until the mixture stands up in stiff peaks.
Add the caster sugar slowly to the egg white foam, a tablespoonful at a time whilst whisking on high speed, until the sugar is all used and mixture takes on a glossy sheen, then stop.
Lastly fold in the icing sugar one dessert spoon at a time, using a ‘figure of eight’ movement and taking care not to knock the air from the sugary foam.  If you try to cheat and beat it in with the electric whisk you will fail.  I’ve tried it and the end result resembles a sugary doorstep on which you could easily break your teeth!
After all the icing sugar has been thoroughly mixed in, put dollops of the mixture carefully and equally into the flan tins.  Smooth the tops, you’ll only be able to make them look ‘swirly’ because by now the mixture is quite gooey – try not to get splodges on the sides of the tins, they can get charred in the oven, make it difficult to extract the finished meringue from the tin and give it a burned taint.
Put the loaded tins on a lower mid shelf in the oven, set the timer for 90 minutes.  When timer pings, reduce the temperature to 80 C and reset the timer for another 60 minutes and wait.  What is happening here is that we are not cooking the meringues in a conventional sense; we are simply drying the egg/sugar mixture – Simples!
It is easy to tell if the meringues are ready, press VERY lightly on the top – if there is no “give” they’re done.  If you still feel a little movement, let them dry as the oven cools down, go to bed, have a stiff drink or take the dog for a walk until they finish.
When the meringues are lovely and crisp, take them from the oven and leave them aside to cool in the tins for half an hour or so.  You should see them break away slightly from the edges of the tins as they cool down.  Now for the tricky bit, getting the finished product out!  Try not to smash the meringue discs or you’ll have to revise your dessert offering to “Eton Mess.” Start by gently flexing the sides of the tin and then deflecting the base a little to free up the meringue – all being well it’s time to remove them.  Put a clean flat board over the top of the tin; flip the tin over and Voila!  The meringue plops on to the board – we hope!  Repeat!  We now have the job more or less licked, excuse the pun.
Let the meringues cool thoroughly to room temperature before starting to assemble the gateau.  If you don’t, your whipped cream will melt as you load the gateau and the cat will be all over the kitchen worktop having a birthday with the dripping cream!  At this stage meringue can be stored, either in the fridge or even the freezer.  Just make sure this you seal it well in an airtight plastic bag or it will go soggy.  It will anyway later, but at this stage you’ll want to present it looking pristine.
Filling and sauce (Coulis)
Wash and ‘hull’ the strawberries, drain them well and put them in a pan with a glug or so of Cointreau.
Shake the caster sugar over them.
Heat the pan until the juice from the strawberries, Cointreau and sugar melt together, don’t let the mixture boil, the fruit should still be firm’ish when you load the gateau.  Cover the pan with a lid and set aside to cool.
When the fruit is cold, drain and reserve the juice and a tablespoonful of fruit.
Reduce the juice/and reserved strawberries over a high heat, stirring constantly until it has a jam like feel.   Remove it from the heat immediately and blend it to a coulis with a high speed, hand held, electric blender.  Set it aside in a clean jug or bowl.
Cream
Put 250ml of 35% whipping cream into a clean, cold bowl.
Add the icing sugar and beat together with an electric mixer until the cream begins to thicken
Add the mascarpone to the mixture and continue to whip the cheese/cream mixture until it becomes firm.
Assemble the gateau
Put one round of meringue on to a clean circular board, ‘swirly’ side up if it is still attached; leave the cartouche on the base layer of meringue.  It helps when you cut and serve a slice.
 
Loading the filling
 
Load the top of the meringue with two thirds of the whipped cream, making a slight hollow in the centre and leaving perhaps 3cm free at the edge (‘coz you’re going to press down on the top layer soon and we don’t want it oozing out!)  Add the strawberries into the hollowed out cream “nest.”  Next, make sure that the cartouche is NOT attached to this, the second layer of meringue!  Then ‘butter’ the underside with most of the remaining cream, place it on top of the loaded base meringue/strawberry/cream  layer and gently press the layers together, saving just a little for decoration on the top.
Finally put about eight teaspoonful's of the remaining cream, evenly around the circumference of the top meringue, put a strawberry on top of each blob of cream.  Then relax, you’ve done it!!!  Get ready for the applause from your guests and avoid the bathroom scales for at least three weeks
If you wish, the gateau can be frozen at this stage, for no more than a week, do it straight away if you’re not planning to serve it same day, then the juices will not have time to soak into the meringue and make it soggy.  In fact I like to freeze mine anyway; it is easier to cut whilst it is frozen or semi-frozen.  Cut it first and de-frost for an hour before serving.
Serve with just a little of the coulis “napped” (drizzled in plain English) on top of each slice and on the plate.
!


Sunday, January 26, 2014

Cooking for "Benefits Street" and another rant!

Cooking good nourishing food on a budget is NOT difficult, END OF!  Two recipes this week are examples.
I think all my followers know by now how I feel about the ridiculous amounts of money spent by the chefs in TV cooking competitions!  Its outrageous.  Not only that but most of the dishes wouldn't feed a dormouse!  Contrast this with the amazing examples of skill and expertise demonstrated by the likes of Michelle Roux Jr, Jamie Oliver, Rick Stein, James Martin and "The Gorgeous Pouting One" Nigella! Does anyone seriously believe that a woman with such a gorgeous Junoesque figure could possibly be a "cokehead" - if they do, they're deluded! They don't know what 'Charlie' does to its sad addicts and I've seen more than a few!
Oh and more rants.  Buy your ingredients from proper butchers, greengrocers, fishmongers and bakers, go to the markets, support them and they will help you to select the best ingredients.  Just tell them what you want to make and they'll become your friends.  Use supermarket groceries if you have to, but just think about the quantity of packaging they use and how many times your goods have been handled before you get them: And bl**dy 'sell by dates' and 'use by dates' are a complete con to encourage you to throw good stuff out.  What a waste of resources!  Try my test, the "Smell by Date."  If its smells OK cook it thoroughly and put it on the table!"
Lets get real and cook for a family for pennies (or centimos) this week. "En Avant Mes Braves."
First off a good nourishing North Country dinner for 'common sense Monday.'  Yes, that's what they used to call it when almost all the money had gone over the weekend on whippet racing and mild ale in the "Muckshovellers Arms;" and it was time to eke out the small change.  Ribs n' Cabbage is about the easiest thing in the recipe book.  It tastes fabulous, its warming and of course is loaded with healthy fibre for roughage.
WARNING it is also quite a "windy" dish - you have been warned!  Do not feed leftovers to the dog unless you have ample supplies of 'Air Wick' spray or gas masks!

Ribs n' Cabbage

Sorry but this dish doesn't photograph well, so I'm sending you a picture of the "Gorgeous Pouting Nigella" instead.


Ingredients - for four servings
  • 1 Large green 'Savoy' cabbage.
  • 6/8 Meaty spare ribs from the wide end of the rack.
  • 1 Chicken stock cube.
  • 1 Litre water.
Method
  • Remove the outer leaves from the cabbage, wash and reserve.
  • Check that the remaining cabbage is clean and bug free then shred it finely, including the heart, just chop it even smaller!
  • Put all the shredded cabbage in a lidded earthenware 'crockpot.'
  • Rinse the ribs (two per person - three for hearty eaters) in cold water, chop each into two pieces and add them to the pot.
  • Mix the ribs and cabbage together with a clean hand - it won't hurt.
  • Boil a little of the water, dissolve the stock cube in it and pour it into the pot.
  • Add the rest of the water.
  • Put the outer leaves on top of the cabbage and rib mixture to help conserve the juices during cooking.
  • Cover the pot and cook on the middle shelf of the oven at 160C for about 90 minutes until the meat on the ribs is tender.
  • Check the seasoning and when cooked, correct as necessary.

Serving

Serve a generous helping in large bowls with any old bread to mop up the juice, even if it is a bit stale.  If you feel like adding a few more carbs for an energetic audience then put a big bowl of fluffy mash in the middle of the table for people to help themselves.

Cost

£0.76/serving using ASDA internet grocery prices at 26th January 2014.  Not including bread or potatoes. 

***************************************************************************************************

Its a double helping this week.


Next up is another hearty "Benefits Street" meal for the family that also comes with a health warning.  DO NOT feed this to children who have not had at least one hour of energetic outdoor playtime, it contains a shedload of calories.  Scrumping apples or pears counts, its cheeky and energetic especially if the owner of the apple trees is grumpy; nicking tele's from all over the parish and legging it to the fence, not over itis not, its a crime!

"Grannie Betty's" Stuffed, Roast Jacket Potatoes with sausages.


Ingredients for four servings
  • 4 large baking potatoes
  • 8 good quality pork sausages
  • 300gm strongly flavoured "melty" cheese
  • Corn oil
  • Salt
Method - Potatoes
  • Wash and dry the potatoes.
  • Put plenty of salt in a bowl and add a generous glug or three of cooking oil.
  • Put each potato into the bowl and roll it around until it is covered in salty oil.
  • Cup the potato in your hand and roll it around to make sure it is thoroughly dressed with the mixture.
  • Put the oily salty potatoes on a baking tray and cook them in the oven at 160 C for about forty five minutes to an hour until the are done.  They should be lovely and brown and crispy on the outside and soft in the middle when tested with a skewer.  Leave the oven turned on we're going to need it again.
  • When cooked, take the potatoes from the oven and carefully (they'll be hot) put each on a chopping board and cut into halves with a sharp knife try to keep the skins intact.
  • Scoop out the lovely centres and set aside in a clean bowl.  You should have just the crispy skins left.
  • Grate the cheese into the bowl containing the potato flesh, tip the cooking oil in too if you like and mash it and the cheese into the potato.  Do NOT grate your knuckles and fingertips, I don't know what they taste like but its painful and you'll need them again tomorrow!
  • Load the cheese/potato mixture back into the skins, put them back on the roasting tray and then back into the oven until the cheese mixture starts to bubble up and the potato mash gets brown and a little crispy on top.

Method - Sausages

There are two ways, traditional or the low calorie, "Ellesmere Port" way if you're trying to save on calories (who could be really, making this meal?) it's your call.   However I will explain, 'coz you might like to use the low calorie method another time.

The traditional way
  • Prick the sausages all over then just put them on a tray in the oven alongside the spuds while they are cooking until the sausages are cooked to your liking.
  • I normally put them in for about twenty minutes (half the cooking time of the potatoes.) 

The 'Ellesmere Port' low calorie way!

So called because when my first ex (the nice one, not the other,) was training to be a midwife, she was sent to lodge with an 'old bird' in Ellesmere Port whilst she was training to deliver babies; who insisted on poaching sausages before she grilled them. Obviously to get the fat out, but I often wondered, and for those of you not in the know, Ellesmere Port in Cheshire is one of the biggest manufacturers of heavy chemicals in the UK, whether it might also be a way to remove environmental contaminants too!
  • Boil a large pan of salted water and then reduce it to a simmer.
  • Prick the sausages all over then add them to the pan.
  • Bring the water back up to a rolling simmer so as to poach the sausages without splitting the skins and cook for about fifteen minutes.
  • Tip the greasy water from the pan then put the sausages on a tray and as before, roast them in the oven until the skins are brown.  They will be drier, so take care not to burn them.
Serving

Put two of the loaded potato halves on a plate with a pair of the sausages and if you feel like adding a side serving, baked beans go well.

Cost

£1.70 per serving, less if you use budget bangers, not including beans.

P.S. "Granny Betty," so called by my daughter, was my late mum.  She is the inspiration for my love of food and cooking and could make a delicious dinner from an old shoe.  Thanks mum!


Eat and enjoy - more recipes another day when I feel inspired!

Nigella's picture courtesy of "The Daily Mirror"


Sunday, January 19, 2014


Sins on Sunday are allowed. At least this one is!
Steamed Sticky Toffee Sultana Pudding, with Salted Caramel Sauce 
 
 
Now I know that everybody and his or her uncle is on a diet right now.  I am, but you know and I know that if you’re going to make a real difference, it has to be a lifestyle change not just for January!  And so in my case I’m resisting booze for a month and for the next three months I’ve given up; bread, milk, eggs, cheese, butter, red meat and potatoes, but not forever and not on Sundays!  Just until my belly gets smaller and my stomach gets used to being full on less.  And I’m taking at least an hour of exercise each weekday.  Roll on “Stick Insect.”

OK end of Sunday sermon, because now I’m going to tell you about your Sunday sin!  A diet sin is OK so long as it is a planned part of your new regime, not just a relapse, Oh ‘sod it’, I’ll start again on Monday is not good don’t do it!  Plan your sins, have what you fancy once or twice a week!  In my case it’s a “Full English” on Saturday and if they’re on offer some roast spuds with my Sunday lunch.  So today I’m going to help you make today’s delicious sin;

Steamed Sticky Toffee Sultana Pudding, with Salted Caramel Sauce

As well as the ingredients, you’ll need:-

Patience and planning.  This dish takes around 30 minutes to make, but around three hours to cook, but it really is worth the wait.  Watch your guest’s faces as they lick their spoons and wonder if they could possibly fit “seconds” in!
  • Silicone kitchen paper
  • Aluminium Foil
  • Pudding Basin (1Litre)
  • Large Mixing Bowl
  • Electric Mixer
  • Large Pan for steaming
  • Food Processor and a variety of spoons and jugs.


Ingredients and Method

Sticky Toffee Sultana Pudding Mixture
 
200g stoned dates
100gm golden sultana
1 tbsp vanilla essence
50g/ soft butte
175g brown sugar
4 tbsp golden syrup
200gm self raising flour
2 eggs
1½ tsp bicarbonate of soda

Salty Caramel Sauce
200ml double cream
100g butter
175g brown sugar
1 dessert spoon water
1 tsp coarse sea salt
Method - Pudding
First
·        Get ready by half filling the large saucepan with water and bringing it to the boil, then reduce to a simmer.  Carefully put a saucer in the bottom before the water boils.  The saucer makes certain that the base of the pudding basin is always immersed in water and never touches the bottom of the pan directly.
·         Prepare the pudding basin by greasing it with runny butter. Add some of the brown sugar and shake it about until the inside of the basin is coated in sugar.  Throw out the excess
Then
·         Put the the dates and half the sultanas in a jug and scald with boiling water for five minutes.  Then tip out all but 100ml of the water and “blitz” them in a blender or food processor until they’re not quite a paste and you can still make out a few small’ish lumps on the mixture.  Add the vanilla essence and give one more ‘whizz.’
 
·         Beat the softened butter and brown sugar together in a mixing bowl, with the electric whisk until smooth.

·         Add the golden syrup, flour, eggs, bicarbonate of soda the blended dates and the rest of the sultanas. Stir gently until thoroughly mixed.

·         Pour the mixture into the prepared basin. Make a circle of silicone paper about 10cm larger than the diameter of the basin, butter one side.  Put it on top of the basin, butter side down and tuck the edges under the rim of the basin as well as you can. Next put a circle of aluminium foil on top of the silicone paper and fold the edges over the side of the pudding basin in a pleat.  And if you haven’t got a special lidded pudding basin, like mine, then tie the foil to the basin with a couple of turns of string.  Make a good tight knot and then loop the string so as to make a handle to lift the pudding out, later.

·         Put the basin into the saucepan of simmering water. Put the lid on the pan and control the heat to maintain a gentle simmer for three hours!  Remember not to let the pan boil dry!

Method – Salty Caramel Sauce
 
·         Put a pan over a low heat add the dessert spoonful of water and the salt.  Wait for the salt to dissolve.

·         Add the sugar, stirring all the time until the water, salt, sugar mixture is well mixed. 

·         Add the butter stirring continuously until the mixture starts to froth.  Remove from the heat and test it by putting a drop of the mixture on to a cold saucer.  If it hardens, it is ready, if not cook for a little longer.  Take care not to burn the mixture – it will taste dreadful.  If you do, start again.

·         When the mixture is ready, add the cream, stirring all the time until you get a lovely thick creamy sauce.  It looks like the top layer of a ‘Mars’ Bar, but runnier.

·         Take the pudding from the pan, carefully, take off the lids then put a serving plate on top of the basin, invert it and wait.  The pudding will slowly ‘plop’ down on to the pate and be ready to eat!  Dress the pud with a little of the sauce and serve in individual portions.  Put a jug of extra sauce on the table from which people can help themselves – they will!

·         Serve with Ice cream or crème fraiche!

OK folks – that’s it for today.  Remember though, no more sins until next Sunday!